Saturday, July 24, 2010

Challenge Submissions of the {romantic} variety


Tonight's submission is pulling double duty again! I love combining challenges because the entries all become much more original. The color palette came from our wonderful friends over at The Play Date Cafe The colors for this challenge were {Black, Grey, White, and Cream} and once again I was inspired by the {story} behind the challenge. This go round the challenge palette came from a hotel that the host visited with her husband twenty years ago. {sweet, right?} so I couldn't help myself and made a romantic sweet card. I also pulled in a challenge from Charisma Cardz which was {anything but square} I pulled this in {obviously} in the ornate shape of the card.


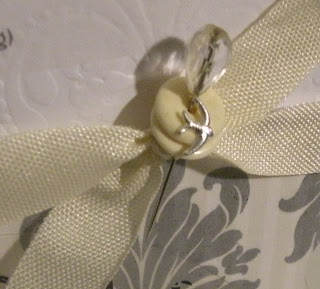
The last thing I added was a sneak peak for you all at next weeks tutorial tuesday... On tuesday we will be looking at all the different ways to decorate those beautiful little stick pins we are all loving right now. I will be showing many different variations and giving away some blog candy. The candy will have some vintage {and not} stick pins plus charms, buttons, and all the other embellishments we will be showing that day. So make sure you are here for that!


{Materials Used:}
  1. Storybook Cricut Cartridge for shape
  2. Anna Griffin 1149 for the black damask print
  3. The paper company translucent classic stripe for the creamy stripe overlay on the damask
  4. Heidi Swapp mini overlays {clocks}
  5. Vintage pin and beads
  6. Tiny Swallow charm from Etsy {Smiling Frogs}

Winner {Winner} Chicken Dinner

Winners of the first five followers competition are ready! Two of you have already been contacted and sent me your addresses- Here are the remaining three:

  1. Valerie G.
  2. Jamie
  3. Brenda Burfiend
Congrats Ladies! Send me your home addresses @ JenniferOsteen@ymail.com to claim your prizes and thanks so so so very much for being my first followers. You all mean so much to me as I start this journey!

Also, while I have you here let me remind you there is a giveaway going on that only one person has taken a shot at. There are two thrifty thursday posts I will be pulling a random comment from them to win the thrifty thursday {prize pack} located in the first thrifty thursday post. Two posts + a comment on each = two chances to win!

Good luck and see you later tonight with another {post}!

Friday, July 23, 2010

{Contest Entries} with old world charm!

So, the Embellish Magazine contest for this week was very inspiring! The challenge was to use Kraft, Turquoise, Brown and Orange and also to incorporate some ric rac. They used some beautiful old world travel pictures to convey the color scheme and I was as inspired by those as I was the palette. Here is my submission:
I just loved the old world details I chose for the top left including this {beautiful old key} I got at a thrift store. Here is a close up of the corner embellishments:
If you would like to craft along with this challenge just click the Embellish Magazine Link in the first paragraph. I also thought this would be an excellent card for a man so I chose to make it a birthday card and enter it into Caardvarks Birthday Challenge! Click here to check it out.

Hope you were inspired... See you next {post}

Friday Organization Tip: {stampers index} and giveaway!

So, one of the biggest problems I have as a crafter is knowing & {remembering} what supplies I have. This happens the most with ribbon, stamps, and embellishments. I will be showing you in the next couple of weeks different ways I have found to give myself {sample guides} of what I have. This weeks is {stamps!} I have a bunch of stamps and they are scattered amongst a couple of bins and baskets I have for them. They are pretty organized but I still would have to take all the bins down and look through them to place my eyeballs on each one.

Now I know it is not thrifty thursday anymore but this organizational tip is cheap and thrifty nonetheless. While I was out thrifting wednesday with my mom she was telling me all the alternative uses for these once adored flipper photo frames. I thought this one was so amazing I had to get it right to you all! So I bought one {there are a million of these everywhere at thrift stores} to make a stamp guide.

I got all my stamps out and started stamping 4x6 {the size of photos for the frame} sheets in themes. Like this Halloween page:
I also made notes on the pages before sliding them into the protectors about which bin the stamps were located in. You can see that above and in one of my Christmas {sheets} below:
The last step was to use my binder tab punch to make some tabs. I picked a nuetral paper because my craft area is in the public part of the apartment and stamped an image or saying from that theme's section on the tab. The tabs look like this:
Here is another page all devoted to {thank yous}:
Some variations:
  1. For those of you have more stamps than one or two of these could ever contain: Make one for each theme. A whole picture frame flipper of christmas, or sentiments.
  2. Those of you who stamp or create for design teams create these in themes of the company or designer who made them.
  3. Use a different ink color on each theme or sheet so you also end up with a stamping rolodex of your ink colors.
  4. If you have too many stamps to do this all in one day {which was a pain I admit} get the frame{s} and then add to them as you have your different stamp sets out until eventually they are all done.
Now for today's {giveaway} comment on how you would use this rolodex to organize your own stamp collection and I will draw a random comment for a {Stampology} set of extra large decorative tag stamps! Contest ends when next friday's Organizational tip post goes up.

Happy {stamping!}

Upcoming Events: {Orlando, FL}

I am very excited about a new homemade crafty bazaar in Orlando, FL this year! The 1st annual Homespun Chic Marketplace will take place on August 8th {My birthday} at the Winter Park farmers market in Downtown Winter Park, FL. The vendors are full but I have put my self on the waiting list and I will surely be there booth or not reporting on all the excellent things I find and posting them here! There is a clickable widget on the side of my page for the event: {check it out}

Also don't forget to comment on the two thrifty thursday posts for a chance to win the little mini blog candy. Two posts+ a comment on each = two chances to win!

See you in a bit for a new post!

Thursday, July 22, 2010

{Thrifty} Thursday: Christmas in July, tutorials, Inspiration, and Giveaways----{continued!}

Let the thrifty crafting continue! This little guy just broke my heart today. He was supposed to be a whole snowman stuck to a piece of foam tape in there with snow to shake around but he dropped his hat and {his nose fell off} he even lost his grip to the tape....very {sad} Soooo I rescued him! I cut a hole in the back and stole everything out of it. Rebuilt him on a a card with some of that white mulberry paper. I couldn't let him get too hot {I live in Florida after all} so I let him take his snow with him.... on his hat and his "feet". {but I saved you some in the prize pack!}


Don't forget to comment on both thrifty thursday posts for two chances to win the goody {bag} Contest ends monday at 3:00p.m. We have some cards and a great organization post for you tomorrow! See you later {alligators!}

{Thrifty} Thursday: Christmas in July, tutorials, Inspiration, and Giveaways

So, lets be honest: I am {not} rich....and most of you are not swimming in swimming pools filled with money! Crafting can be expensive and I like to combine my love of thrift stores with my passion for crafting. On Thursdays I will be bringing you gobs of delicious ideas made from, with or inspired by my thrift store finds. I had an amazing day at some thrift shops and antique stores with my mom yesterday and my husband today.

On the top are some cute finds that are just for me but wanted to share. The pillow on the bottom is adorable I bought three- {only .69 a piece!} The snail hook is where my purse will be living and those gridded borders will definitely be put to good use.
On the bottom are my finds for crafting! So many delicious things....Read on to see how I used these items in my cards for today!
{blog candy!} Since I know the bad part of thrifting is that you wont find the same things I did and vice versa I bought some extra as giveaways for you readers! At the end of the post find out how to get your hands on this {not expensive} but very cute {prize}!
The inspiration for this card was a three dimensional soft plushie ornament with super cute {beads} and {stitching.} I cut a slit in the back and pulled out all its guts first. Next I trimmed around the image in a smaller circle cutting off the beads {don't freak- I saved the little guys} Lastly I took some light blue embroidery floss and stitched the edges. I love using different hues of the traditional primary red, green, and blue holiday colors. The paper I wanted for the card {me and my big ideas Holiday specialty card-stock pad} unfortunately featured much bolder hues than I was looking for so I covered it with {the paper company silver fluorescent paper} which changed all the darks to their pastel counter parts. Add some {Martha Stewart} holiday rub ons and you are off and running!


{thrifty} thursday: card two
This card I did for CPS Sketch #176 Challenge. I loved the sketch but then today when I was thrifting I found two chintzy kitchen magnet frames {the other one is in the prize pack!} I layered a gold written overlay {making memories clear creation: travel} on top of the two pieces of teal cardstock. I used a {making memories} embellishment on the frame and {fashion naturals} hemp cord in two colors across the card. The edges and everything in between were inked with {colorbox gold ink} to pull out the gold writing on the travel overlay. Quote is from {DCWV "Quote Stack" friendship/colored}. My husband really likes this card he kept saying: "you will win for sure" and he didn't understand when I told him this one was a random drawing. {He is cute!}

Well I am going to post s'more thrifty thursday stuff later tonight... but lets get to the prize instructions. This one is easy it will be a random selection from the comments. Since there will be more than one {thrifty thursday} post tonight you will have multiple entry options. Contest ends monday at 3:00p.m.
{Good Luck!}

Wednesday, July 21, 2010

2 Sketches 4 You Challenge: Kazan's Sketch 57

So, I am not usually terribly inspired by sketches...They are drab, lack color, etc. But this one just shot off the computer screen at me. I absolutely loved this challenge and I loved this sketch. Check it out then scroll down to see my interpretation:

Instead of directly interpreting the scalloped edge of the sketch into a scalloped edge piece of scrapbook paper I used the scalloped edge of the bottom of the clouds to fill that design element and instead of the three circles I went with the large rain drops.

What I did:
  1. {CLOUDS:} Clouds are hand drawn and cut from white card-stock with a layer of mulberry threaded white paper on top. The background cloud is attached directly to the card; the left cloud has one layer of foam tape to raise it up and the small cloud has two layers to pull it away from the card base even further.
  2. {RAINDROPS:} Large ones are hand drawn and cut and the edges are inked. The little raindrops all over the card are knotted pieces of light blue embroidery floss.
  3. {PLAID SENTIMENT PAPER:} Martha Stewart Collection and is also raised off the card base with foam tape.
Hope you enjoyed todays card challenge posting. Here is the link to the challenge- give it a {whirl} http://2sketches4you.blogspot.com/


Tuesday, July 20, 2010

Moxie Fab World Tuesday Trigger Challenge {Dancing Lanterns}

So, let me just start off by saying I love everything Paper Crafts {as in the magazine.} They are my favorite of the many paper crafting magazines, the designers are awesome, and they have so many fun challenges and giveaways. So this particular challenge is to find inspiration in a given image and create a card with it. Here is the {Trigger} for this go 'round:


And here is my {interpretation}:
My camera is dead {from all the pictures I have been taking for upcoming blog posts} so apologies for the iphone pic quality. I will update tomorrow.
I was inspired by the shape and specifics of the design of each individual lantern {rather than the groupings} and decided to do a direct interpretation of that design. My favorite part is the wire lantern shapes at the top and the bottom {and of course the little orange bow!}

I encourage you to give this challenge a shot! It is a two week-er {because CHA is next week} and is not due until August 1st. To check out the challenge page click the Paper Crafts {moxie fab world blog} link below.

I also wanted to double up on my entries tonight so I chose orange of the different colored lanterns to enter into {Marks Finest Papers} weekly challenge which was to create a card using red, yellow, or orange as the main color. To check out their beautiful stamps or to check out the contest click here: http://marksfinestpapers.blogspot.com/

happy {crafting}


Scrapbook Page Inspiration: {People and their personalities}

So, I thought I would post some of my recent scrapbook pages for layout and inspirations sake. I also thought it would be nice for you that are trickling through in the first days to get an idea of my crafting aesthetic so you know what to expect in the future. Here are three pages I did for myself and the people in my life that I love!

Kyle {My brother in law} He is the writer in the family. I took these pictures and just loved how lost in thought he was. I like to imagine he was writing the next american novel in his head. I used bits from a couple of old destroyed books I have scavenged in the past for projects like this. Including covering the "K" chipboard in a handwritten old diary page from one of the books.

ME! As you can see I am a fan of the three similar pictures in a row layout. This is something my mother did to me my whole life {and I hated it}- taking a million pictures of me with just a little difference. But now I see how great they can be! I love all the fun colors and bits for this page... It really reflects my personality!

Michael {The Husband} I used the three similar pictures scheme for this one again but chose not to arrange them in a row. My husband is very quiet and very shy and he is always just sitting and thinking and pondering like this. I shot for a page that reflected him {muted tones with an intense color pop for interest} and though I wanted it to be sweet and romantic I kept it minimally frilly and instead pulled in some small romantic touches like the heart eyelet on the bottom right.

I hope this provided some inspiration. Leave me a comment and tell me how you incorporate your loved ones personalities {or your own personality} into their pages {or cards} and you will win a mini embellishment pack featuring items from each of the three pages!
I will leave this contest open for two weeks to give time for some people to trickle through and check me out.

Don't forget to tell a friend to come by too and I will see you at the next {post}

GIVEAWAY!

I forgot this in the last post but the first five followers of my blog will get a special prize pack of embellishments! Good Luck!

My First Blog Post {how exciting!}

How exciting is right! I have been a buzz lately with all the talk of the launch for this new blog. I am going to start this blog where all of my craft creations start: My craft area! I live in a one bedroom apartment with my husband so the dream of a room devoted entirely to crafting is a little far off for me right now. However I think I've made good use of a corner I have stolen for supplies and then used some creative decorating to hide some of my other odds and ends around the house. I have posted some pictures below of my craft storage and I hope you will check back with me in the future as I will be doing an organizational idea, tip, or tutorial once a week.

The full view of my little corner space. I keep a lot of my tools here. Yarn, massive amounts of 12 x12 paper, albums, spools upon spools of ribbon, tiny embellishments, books, etc are all spread out elsewhere among the house.
The small and large brown bins on the left house my stamping supplies and the brown bin on the right is home to my many chipboard pieces. I love the rack in the middle: It's where I keep my newly done cards and small projects.
These cube cubbies are great! Mine is from IKEA (like everything else in my apartment) but they have them at Wal-Mart, and Target too.

My storage solutions for small embellishments, ribbon, etc will be posted in the weekly organizational tutorials. So look forward to that.


Speaking of coming back in the future let's talk about some of things you can look forward to at my blog!

Tutorial Tuesdays: A workshop or step by step instructional guide to a technique or project every Tuesday!

Organizational Tips: Once a week featuring storage and organizational tips from me and guest contributer Deborah Hoag!

Free patterns, fonts, and other great downloads!

Lots of cards, scrapbook page layouts and other delicious paper craft inspirations!

and the thing we all really want: GIVEAWAYS! To increase traffic to my new blog I will be doing a giveaway with almost every post! With very few followers at this point your chances for winning will be like shooting fish in a barrel {although it is not nice to shoot fish at all- in a barrel or otherwise!} Also, get your friends and family who craft involved in building this community because I will be doing a lot of double giveaways- one for you and one for a friend who posts as well.

Thanks for visiting today and I hope to see you back here tomorrow for a great post and some giveaways!